View this article in another language
- 한국어
- English
- 日本語
- 中文
- العربية
- Español
- Français
- Deutsch
- Pусский
- Tiếng Việt
- Indonesian
*This is the fifth part in our series, “Onggi, traditional earthenware vessel in Korea.”
Moving the raw pottery
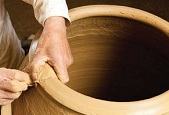
The finished raw pottery needs to be moved from the potter's wheel to the kiln for drying. It takes caution and proper equipment to move because it can easily be broken or damaged. Smaller pieces of uncooked pottery can be moved by hand, by one person with proper wooden tools.
Larger pieces of pottery require the lower half of the pottery to be wrapped in a cloth, called a deolbo in Korean. It is this cloth that is used as a carrier to get the raw pottery to the kiln.
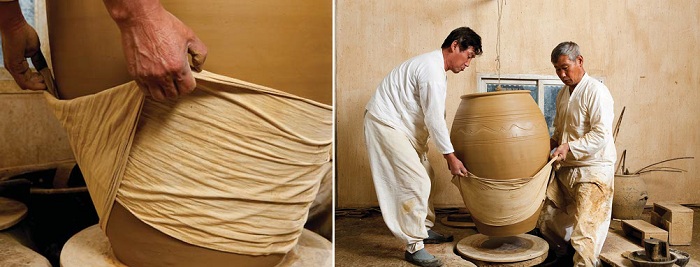
1. Wrap the body of the unbaked urn with a large cloth to move it.
2. Two people are generally needed to move the larger pieces of uncooked pottery from the potter's wheel to the kiln.
Drying and glazing
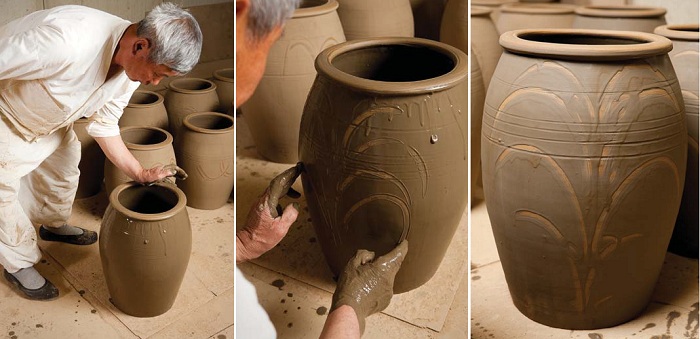
After shaping, the raw pottery will first be dried, glazed and dried again, before being ready for firing.
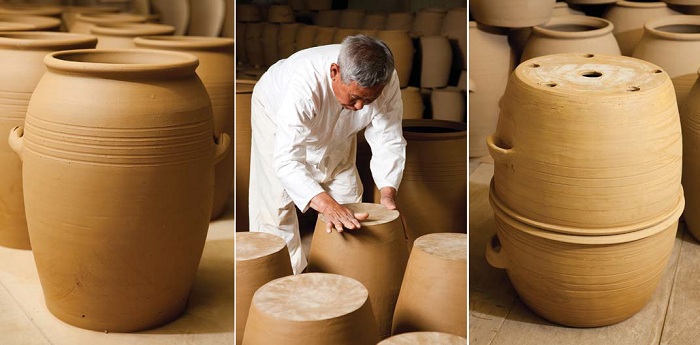
1. The unbaked urn goes through an initial phase of drying before being glazed.
2. The craftsman makes a gentle indentation in the bottom of the urn. This dent is made when the uncooked urn is turned upside down and the artisan gently taps around the bottom to make the indentation.
3. Uncooked pottery is left to dry.
The first drying of the earthenware has to be done either in a shady area under a tree or under a boarded roof. If exposed to direct sunlight, the body of the urn can twist, warp and crack. When the raw pottery is partially dried, it is turned upside down and the craftsman makes a gentle indentation in the underside by tapping it lightly with his hands. This is to prevent the bottom from sagging, as the intense heat in the kiln can cause some swelling.
The glazing can be completed once the pottery is dry enough to be moved safely. The lye is a mixture of pine leaf, grass ashes and clean soil. For a good color, the ratio of the mix depends on the type of soil.
To glaze the pottery, dip the dried urn into the glaze tub and move it around so that it is completely covered, in order that the surface, both inside and out, is evenly glazed. The glazed pottery is then placed upside down on the supporting stand next to the tub, allowing the excess lye to drip off. The pottery is moved either to a shady or a sunny area, depending on the situation. At this point, decorations can be carved into the side of the glazed urn.
In terms of decoration, normally images of an orchid, other flowers, a butterfly or a fish are used to adorn the side of the urn. The second drying can begin when the pottery is dried enough to withstand direct sunlight. Afterward, it will be moved to a warehouse and sorted into separate lots.
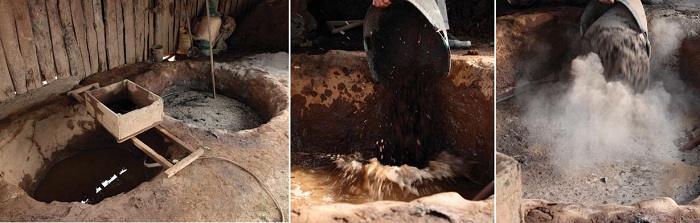
4. The glaze tub and adjacent stand are used to evenly cover the uncooked pottery with the lye mixture.
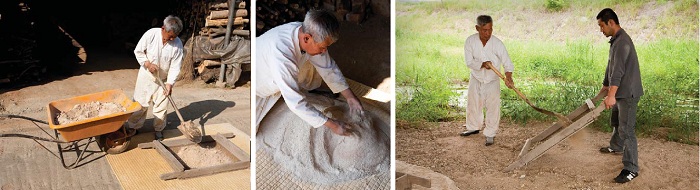
5. The lye mix of soil and ash is stirred in with water to make the glaze.
6. The mix of soil, ash and water is used to make the glaze.
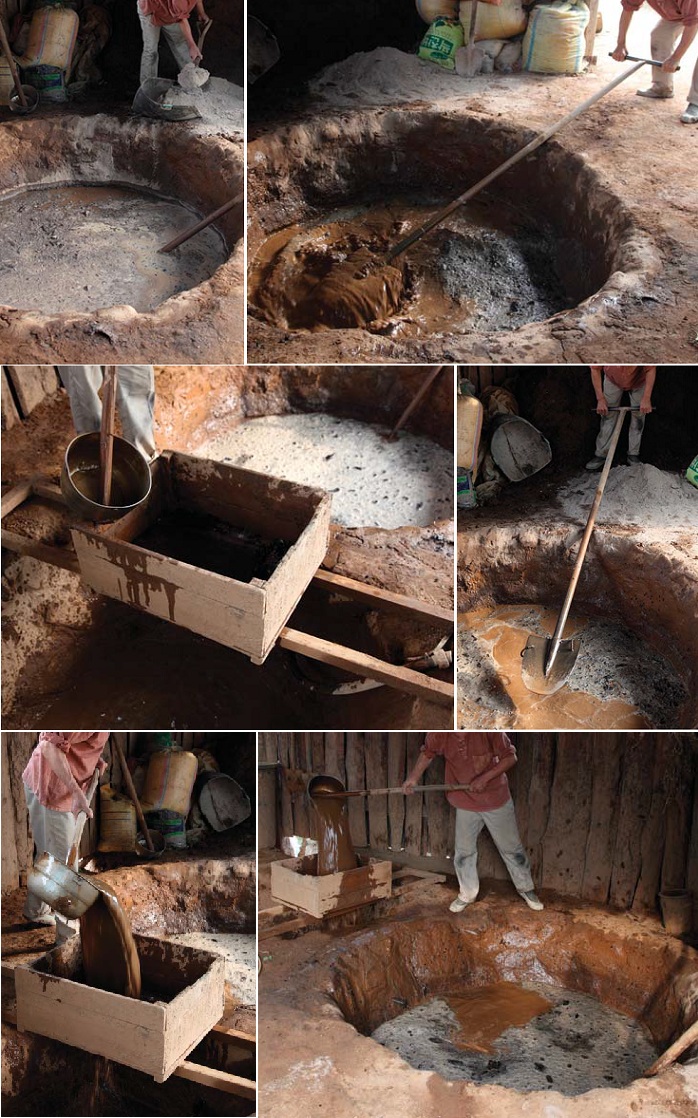
7. The lye mix is stirred in with water in the glaze bath.
8. The lye is mixed with water.
9. A shovel is used to stir the lye mix and the water.
10. A sieve is used to remove any foreign contaminants from the glaze.
11. The glaze is sifted to remove any particulates or contaminants.
12. Any unwanted substances are removed from the glaze.
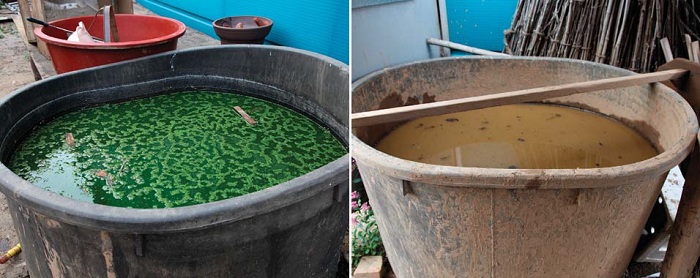
13. The glaze is a mixture of the lye, itself a mix of soil and ash, and water.
14. Wood ash is also included in the final glaze mixture.
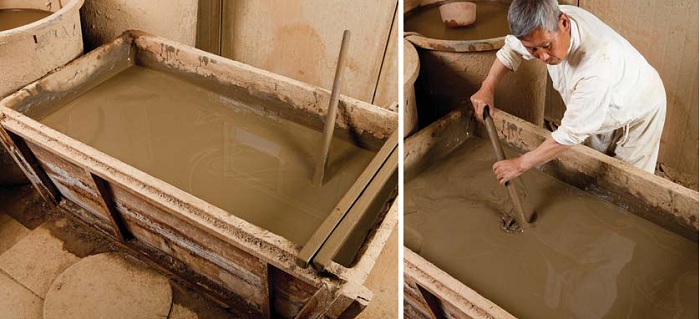
15. A pine mallet is used to soften the glaze.
16. The lye-water glaze mixture is stirred to assure consistency.
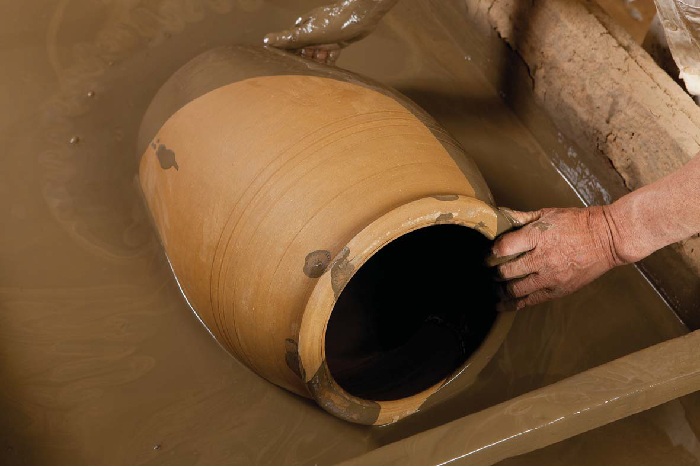
17. The dried but uncooked pottery is rolled in the glaze tub, evenly coating the entire surface.

18. The uncooked pottery is rolled in the glaze tub so that all its surfaces are evenly coated.
19. The uncooked piece of pottery is placed upside down, allowing the excess glaze to drip off.
20. The pottery is placed upside down to remove any excess glaze.
21. The artisan uses his hands to remove any excess glaze from the bottom of the urn.
22. The craftsman uses his hands to remove any excess glaze from the uncooked urn.
23. The potter decorates the glazed urn. A pattern can be made with the finger before the second drying.
24. The glazed urn is allowed to slowly dry in a shady, cool location.

25. The edge of the bottom of the urn is raked out using a metal tool.
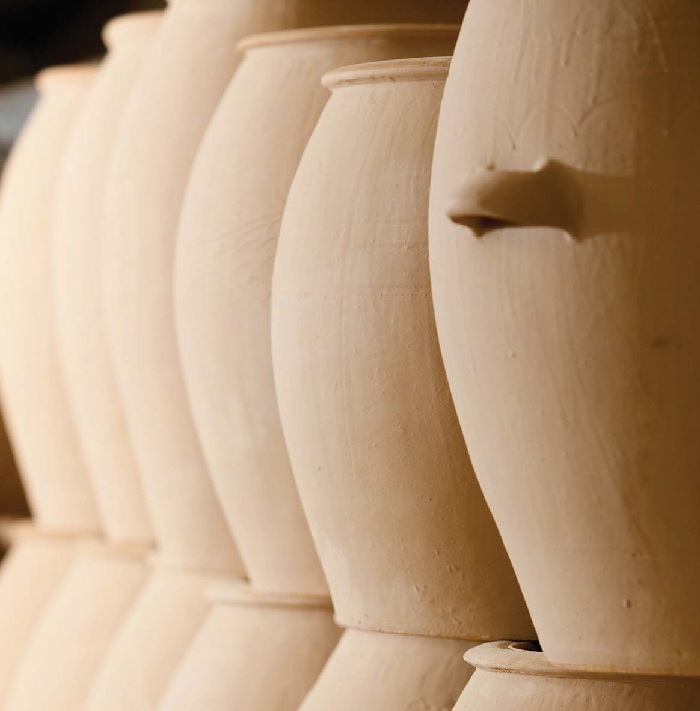
26. The uncooked, glazed urn is dried for a second time. The second drying is a slow process, completed after decoration, and requires a cool, dry area.
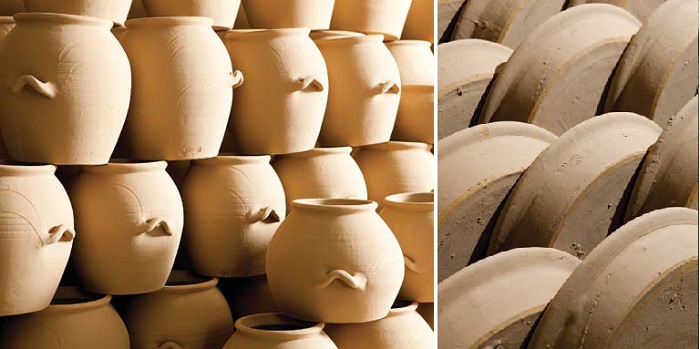
27. The uncooked urn is dried a second time after the glaze decorations are made. The pottery is placed in a dry, cool location throughout the process.
28. Placed in a shady location, the glazed urn is dried for a second time.
Stacking the raw pottery in the kiln
Before the raw pottery can be stacked in the kiln, the base prop stones are properly arranged along the floor of the kiln so that the flames will be able to burn evenly between the floor and the bottom of the urns.
The peak temperature inside the kiln could reach 1,200º Celsius. Because of these high temperatures, unless they are properly balanced, the urns could become unbalanced and possibly get damaged during the process.
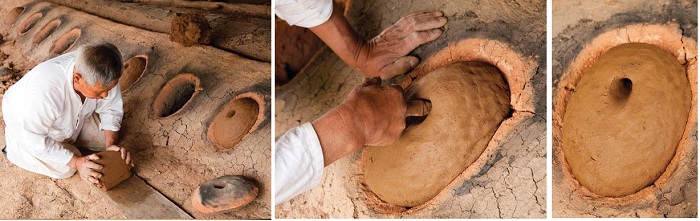
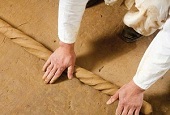
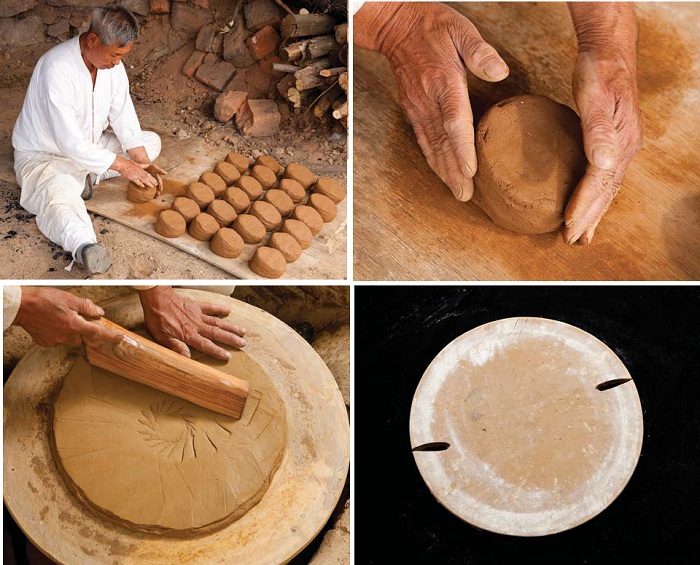
1. The clay is lumped together to make covers for the openings in the kiln.
2. The craftsman makes a smaller hole with his fingers in the top of the cover.
3. The cover of the kiln is made by hand with a small hole in the top.
The kiln is shaped like a tunnel and the urns are placed in three layers, with larger ones at the bottom, and formed into three rows. In order to prevent any sticking from the dripping, molten lye, a rough sand-covered lid is placed between layers.
At times, the smaller pieces of pottery are placed inside the larger ones, in order to bake more pieces of pottery with one fire. In this case, however, the color is lighter because there is less oxygen and a lower temperature.
4. Clay props are formed to keep the urns stable while firing.
5. The clay props are shaped by hand.
6. The covers for the kiln are tapped thin using a wooden bat.
7. A thin layer of clay is placed between urns to prevent them from sticking during firing.
8. The white soil is passed through a sieve to remove any impurities.
9. The white soil has been filtered to remove any contaminants.
10. To prevent the urns from sticking to each other in the kiln, a light powder of soil or sand is used. The soil is first passed through a sieve to insure there are no foreign particles.
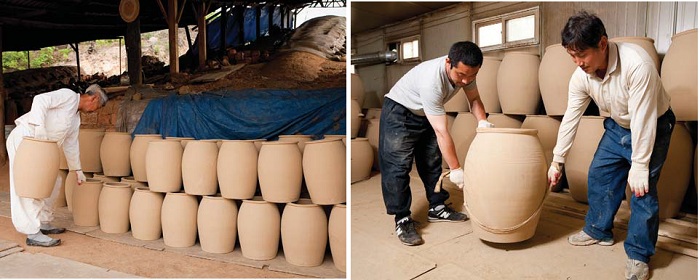
11. The uncooked urns are stacked in the kiln for firing.
12. Larger pieces of pottery are moved using a cloth sling.
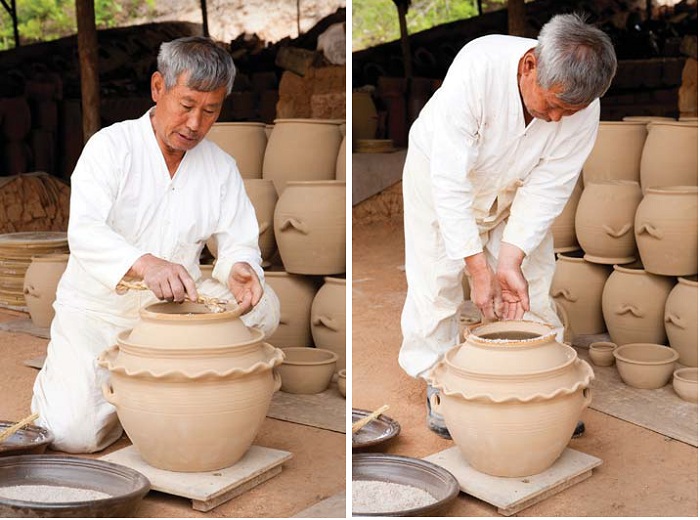
13. A thick paste is spread on the top of the urn before sprinkling it with sand.
14. Sand is sprinkled around the top of the urn to insure it doesn't stick to its neighbor during the firing process.
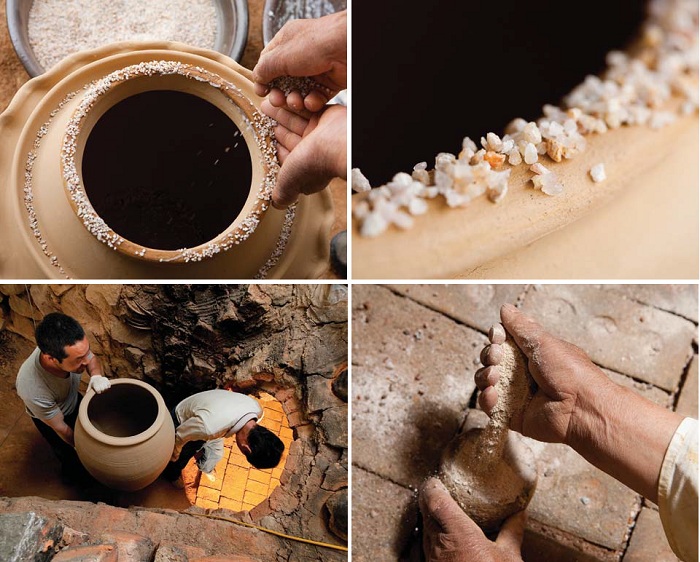
15. Sand is spread around the upper rim of the urn so that it doesn't stick with the other urns in the kiln.
16. The sprinkled sand along the top of the urn is so that it doesn't stick in the fire.
17. The uncooked urn is moved into the kiln through a side opening.
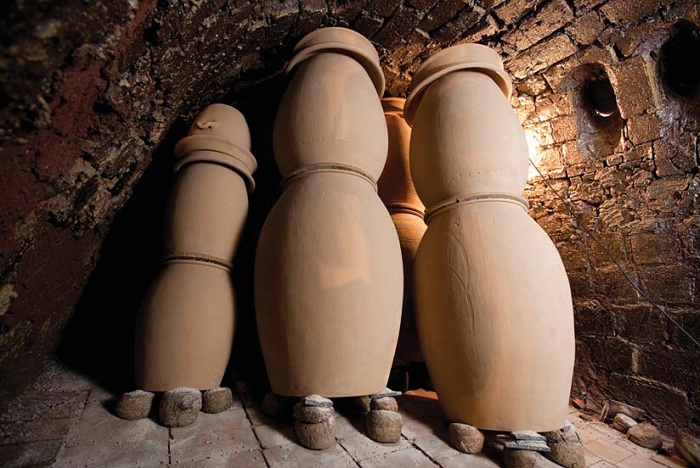
18. Since the kiln is on a slope, clay props are placed along the bottom to ensure the urns remain level during firing.
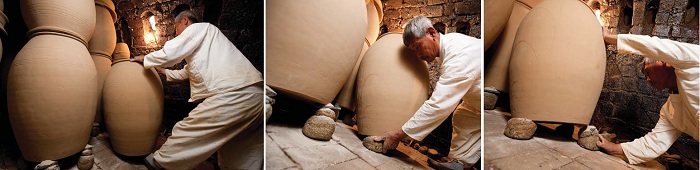
19. The props are placed on the kiln floor to keep the uncooked urns level.
20. The props are made of clay and are pre-fired. They are about the size of a fist.
21. The craftsman places the fist-sized clay props under the urns to keep them level during firing.
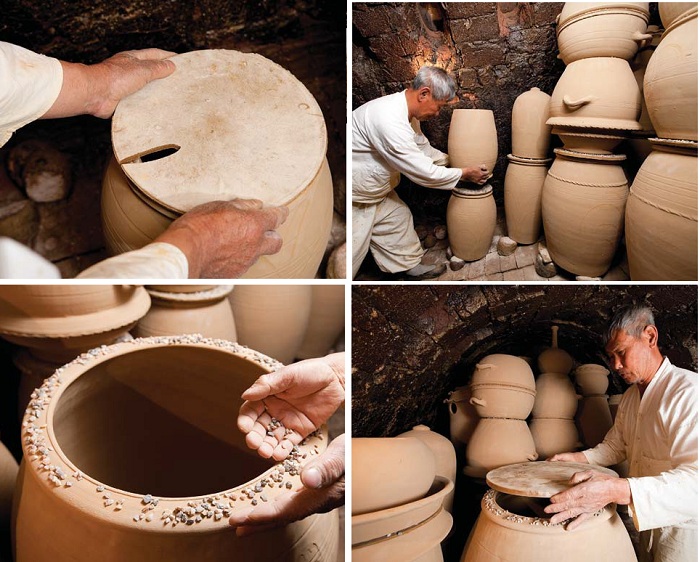
22. Clay lids are placed between layers of urns to prevent sticking and to prevent molten glaze from dripping downward.
23. The urns are stacked on the lids.
24. Coarse sand is spread around the upper lip to ensure the urns don't stick to each other.
25. A lid is placed on top of the sand to separate the layers of urns in the kiln.
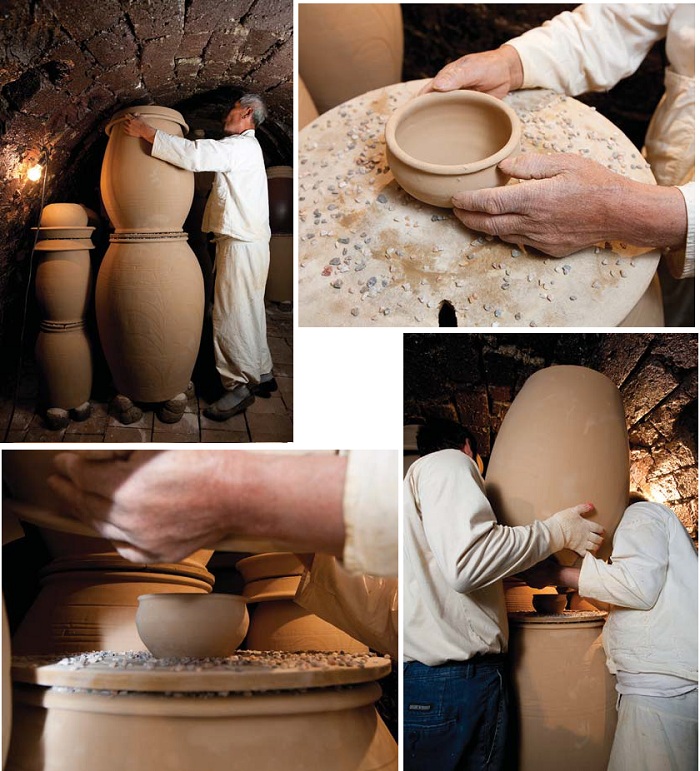
26. A lid is placed atop the top-most urn. (top, left)
27. The artisan ensures the lids of the urns are level. (top, right)
28. Urns are placed upside down atop other urns. (bottom, left)
29. One urn is placed atop another, with a layer of lids in between. (bottom, right)
30. The urns are stacked on top of each other in the kiln.
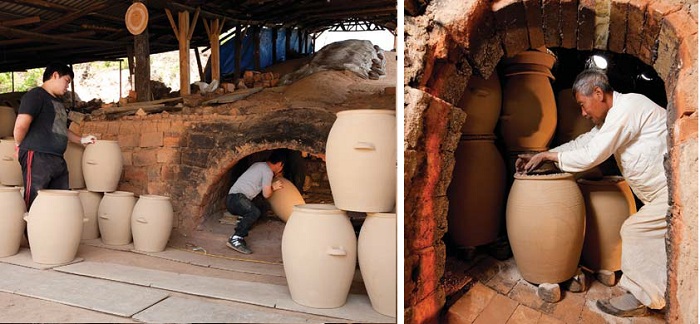
31. The urns are maneuvered into the mouth of the kiln.
32. The raw, uncooked urns are placed inside the kiln through a side opening.
*This series of article has been made possible through the cooperation of the National Research Institute of Cultural Heritage. (Source: Intangible Cultural Heritage of Korea)
Moving the raw pottery
The finished raw pottery needs to be moved from the potter's wheel to the kiln for drying. It takes caution and proper equipment to move because it can easily be broken or damaged. Smaller pieces of uncooked pottery can be moved by hand, by one person with proper wooden tools.
Larger pieces of pottery require the lower half of the pottery to be wrapped in a cloth, called a deolbo in Korean. It is this cloth that is used as a carrier to get the raw pottery to the kiln.
1. Wrap the body of the unbaked urn with a large cloth to move it.
2. Two people are generally needed to move the larger pieces of uncooked pottery from the potter's wheel to the kiln.
Drying and glazing
After shaping, the raw pottery will first be dried, glazed and dried again, before being ready for firing.
1. The unbaked urn goes through an initial phase of drying before being glazed.
2. The craftsman makes a gentle indentation in the bottom of the urn. This dent is made when the uncooked urn is turned upside down and the artisan gently taps around the bottom to make the indentation.
3. Uncooked pottery is left to dry.
The first drying of the earthenware has to be done either in a shady area under a tree or under a boarded roof. If exposed to direct sunlight, the body of the urn can twist, warp and crack. When the raw pottery is partially dried, it is turned upside down and the craftsman makes a gentle indentation in the underside by tapping it lightly with his hands. This is to prevent the bottom from sagging, as the intense heat in the kiln can cause some swelling.
The glazing can be completed once the pottery is dry enough to be moved safely. The lye is a mixture of pine leaf, grass ashes and clean soil. For a good color, the ratio of the mix depends on the type of soil.
To glaze the pottery, dip the dried urn into the glaze tub and move it around so that it is completely covered, in order that the surface, both inside and out, is evenly glazed. The glazed pottery is then placed upside down on the supporting stand next to the tub, allowing the excess lye to drip off. The pottery is moved either to a shady or a sunny area, depending on the situation. At this point, decorations can be carved into the side of the glazed urn.
In terms of decoration, normally images of an orchid, other flowers, a butterfly or a fish are used to adorn the side of the urn. The second drying can begin when the pottery is dried enough to withstand direct sunlight. Afterward, it will be moved to a warehouse and sorted into separate lots.
4. The glaze tub and adjacent stand are used to evenly cover the uncooked pottery with the lye mixture.
5. The lye mix of soil and ash is stirred in with water to make the glaze.
6. The mix of soil, ash and water is used to make the glaze.
7. The lye mix is stirred in with water in the glaze bath.
8. The lye is mixed with water.
9. A shovel is used to stir the lye mix and the water.
10. A sieve is used to remove any foreign contaminants from the glaze.
11. The glaze is sifted to remove any particulates or contaminants.
12. Any unwanted substances are removed from the glaze.
13. The glaze is a mixture of the lye, itself a mix of soil and ash, and water.
14. Wood ash is also included in the final glaze mixture.
15. A pine mallet is used to soften the glaze.
16. The lye-water glaze mixture is stirred to assure consistency.
17. The dried but uncooked pottery is rolled in the glaze tub, evenly coating the entire surface.
18. The uncooked pottery is rolled in the glaze tub so that all its surfaces are evenly coated.
19. The uncooked piece of pottery is placed upside down, allowing the excess glaze to drip off.
20. The pottery is placed upside down to remove any excess glaze.
21. The artisan uses his hands to remove any excess glaze from the bottom of the urn.
22. The craftsman uses his hands to remove any excess glaze from the uncooked urn.
23. The potter decorates the glazed urn. A pattern can be made with the finger before the second drying.
24. The glazed urn is allowed to slowly dry in a shady, cool location.
25. The edge of the bottom of the urn is raked out using a metal tool.
26. The uncooked, glazed urn is dried for a second time. The second drying is a slow process, completed after decoration, and requires a cool, dry area.
27. The uncooked urn is dried a second time after the glaze decorations are made. The pottery is placed in a dry, cool location throughout the process.
28. Placed in a shady location, the glazed urn is dried for a second time.
Stacking the raw pottery in the kiln
Before the raw pottery can be stacked in the kiln, the base prop stones are properly arranged along the floor of the kiln so that the flames will be able to burn evenly between the floor and the bottom of the urns.
The peak temperature inside the kiln could reach 1,200º Celsius. Because of these high temperatures, unless they are properly balanced, the urns could become unbalanced and possibly get damaged during the process.
1. The clay is lumped together to make covers for the openings in the kiln.
2. The craftsman makes a smaller hole with his fingers in the top of the cover.
3. The cover of the kiln is made by hand with a small hole in the top.
The kiln is shaped like a tunnel and the urns are placed in three layers, with larger ones at the bottom, and formed into three rows. In order to prevent any sticking from the dripping, molten lye, a rough sand-covered lid is placed between layers.
At times, the smaller pieces of pottery are placed inside the larger ones, in order to bake more pieces of pottery with one fire. In this case, however, the color is lighter because there is less oxygen and a lower temperature.
4. Clay props are formed to keep the urns stable while firing.
5. The clay props are shaped by hand.
6. The covers for the kiln are tapped thin using a wooden bat.
7. A thin layer of clay is placed between urns to prevent them from sticking during firing.
8. The white soil is passed through a sieve to remove any impurities.
9. The white soil has been filtered to remove any contaminants.
10. To prevent the urns from sticking to each other in the kiln, a light powder of soil or sand is used. The soil is first passed through a sieve to insure there are no foreign particles.
11. The uncooked urns are stacked in the kiln for firing.
12. Larger pieces of pottery are moved using a cloth sling.
13. A thick paste is spread on the top of the urn before sprinkling it with sand.
14. Sand is sprinkled around the top of the urn to insure it doesn't stick to its neighbor during the firing process.
15. Sand is spread around the upper rim of the urn so that it doesn't stick with the other urns in the kiln.
16. The sprinkled sand along the top of the urn is so that it doesn't stick in the fire.
17. The uncooked urn is moved into the kiln through a side opening.
18. Since the kiln is on a slope, clay props are placed along the bottom to ensure the urns remain level during firing.
19. The props are placed on the kiln floor to keep the uncooked urns level.
20. The props are made of clay and are pre-fired. They are about the size of a fist.
21. The craftsman places the fist-sized clay props under the urns to keep them level during firing.
22. Clay lids are placed between layers of urns to prevent sticking and to prevent molten glaze from dripping downward.
23. The urns are stacked on the lids.
24. Coarse sand is spread around the upper lip to ensure the urns don't stick to each other.
25. A lid is placed on top of the sand to separate the layers of urns in the kiln.
26. A lid is placed atop the top-most urn. (top, left)
27. The artisan ensures the lids of the urns are level. (top, right)
28. Urns are placed upside down atop other urns. (bottom, left)
29. One urn is placed atop another, with a layer of lids in between. (bottom, right)
30. The urns are stacked on top of each other in the kiln.
31. The urns are maneuvered into the mouth of the kiln.
32. The raw, uncooked urns are placed inside the kiln through a side opening.
*This series of article has been made possible through the cooperation of the National Research Institute of Cultural Heritage. (Source: Intangible Cultural Heritage of Korea)