View this article in another language
- 한국어
- English
- 日本語
- 中文
- العربية
- Español
- Français
- Deutsch
- Pусский
- Tiếng Việt
- Indonesian
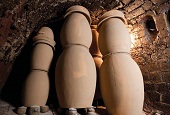
*This is the sixth part in our series, “Onggi, traditional earthenware vessel in Korea.”
Firing the Pottery
The method in which the kiln fire is both ignited and put out is very important to the overall process of making successful pottery. It is a result of the master craftsman's untiring effort. Therefore, before the potter starts the kiln fire, he prepares offerings to the spirits so that the endeavor will be successful.
Usually, the kiln is fired for 2-3 days, or for about 45 hours. During the first 15 hours, the fire is slowly heated up so as to dry any moisture that's inside the kiln. Then, the temperature is increased to around 1,200 degrees Celsius, the melting point for the glaze. This intense fire is continued for about 30 hours.
Specific pine logs, changsol in Korean, are used as fuel for the kiln fire. As the kiln is fired, the master potter controls the flames by feeding firewood into the kiln and by checking on the fire through portholes. There are portholes long both sides of the kiln, allowing the potter to check on the color and quality of the pottery inside.
When the firing is finished, the kiln's fire hole, chimney and wood-feeding holes are all completely blocks, to prevent any heat from escaping. This will go on for another 2-5 days, depending on the size of the kiln and the amount of pottery inside. The entire firing process can take up to one whole week.
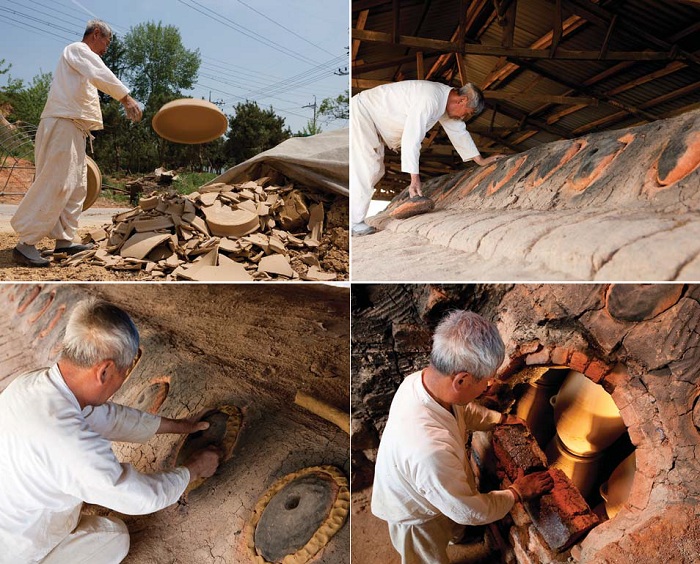
1. Some pieces of pottery are too dry to bake.
2. The portholes in the top of the kiln are closed before firing.
3. The portholes on the top of the kiln are covered and blocked with clay.
4. After stacking the pottery in the kiln, the side entrances to the kiln are blocked.
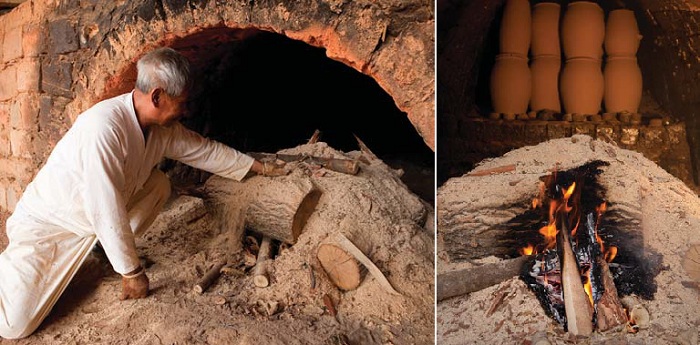
5. To clear the kiln of any humidity, a smaller fire is used at first.
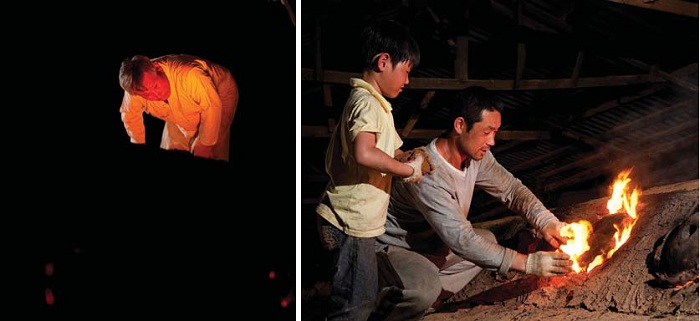
6. The process begins with a small, smoking fire, to dry away any moisture inside the kiln.
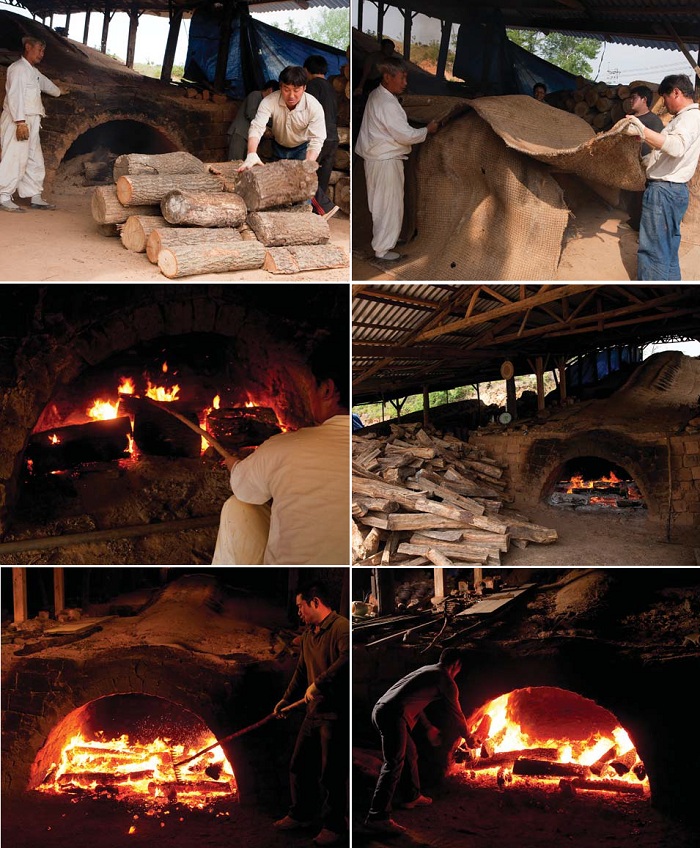
7. Though any type of wood can be used to fuel the fire, it is important to build the fire gradually. This potter uses oak trees to start the initial fire.
8. Lay a protective layer around the kiln to prevent any cold air from blowing inside.
9. Keep the kiln fire burning evenly for 2-3 days.
10. Gradually increase the heat of the fire.
11. As the firing continues, pine logs are used to build a stronger flame.
12. More logs are stacked along the side of the kiln to prevent any of the pottery from cracking due to cooling flames.

13. At the top of the kiln, soon to be used firewood is preemptively dried using the escaping heat from the kiln.
14. Logs are stacked on the top of the kiln, ready for the final burst of heat.
15. The fire is fed from both the front and the back of the kiln.

16. The pine logs are steadily fed into the fire, to keep the flame constant.
17. The master craftsman observes the kiln from a distance as he prepares more pine logs for the flames.
18. The potter studied the flames of the kiln fire.
19. A pine tree log requires three men to feed into the fire. The flames are burning at up to 1,200 degrees Celsius at this point.
20. The wood feeding holes on either side of the kiln are opened near the end of the firing process.
21. Wood is stacked in the front of the kiln to heat up the flames.
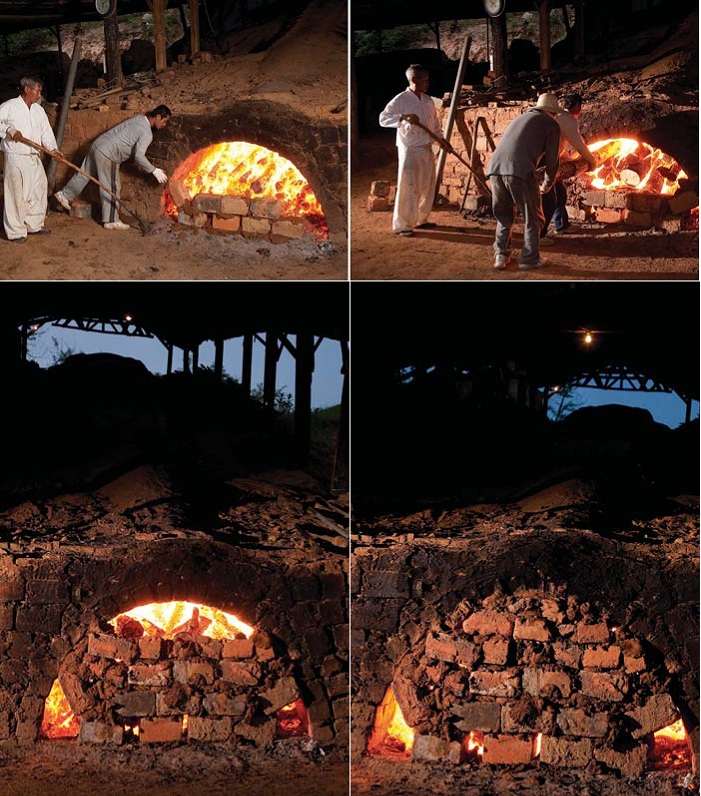
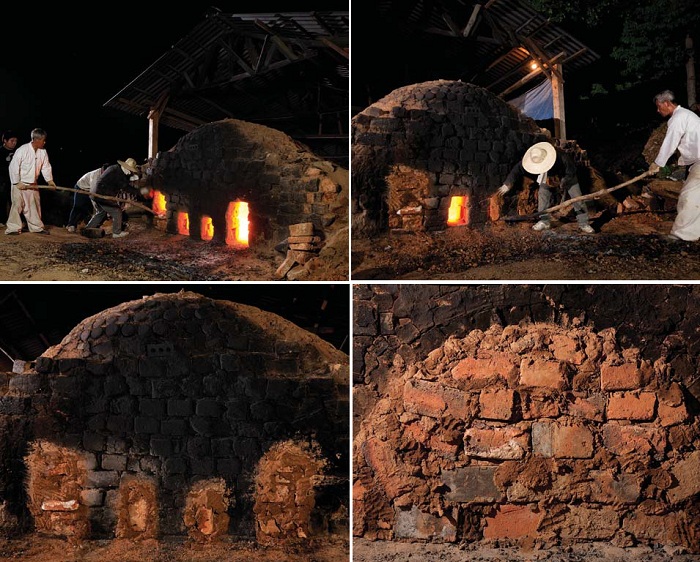
22. When the fire is drawing down, the front of the kiln is partially blocked with bricks.
23. As cold air has begun to enter the kiln, the potters put additional fire onto the flames.
24. The front of the kiln is blocked during the firing process.
25. The front of the kiln is completely bricked over during the final firing process.
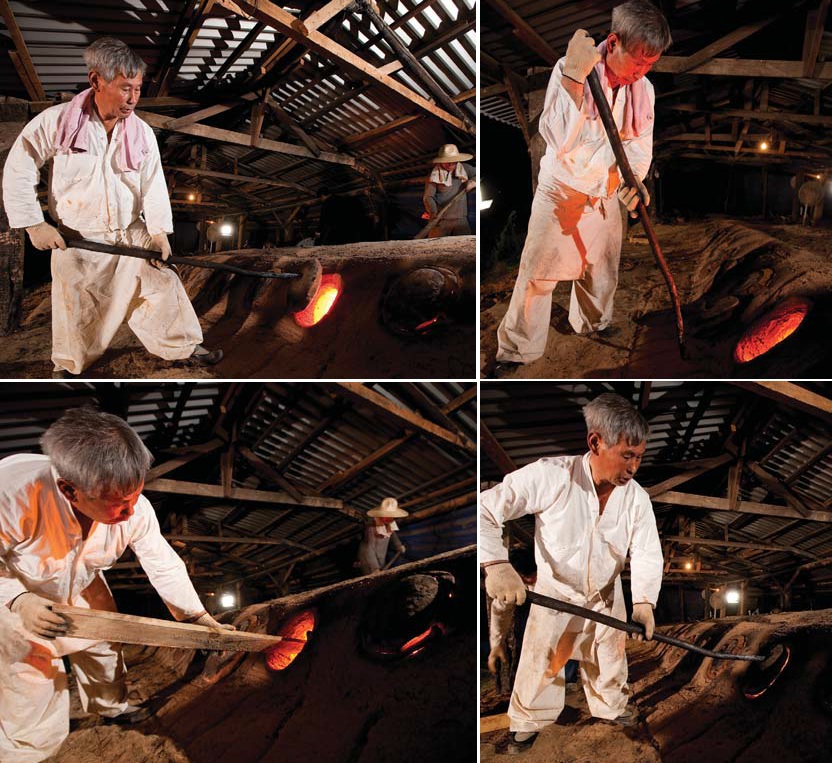
26. The wood-feeding holes on either side of the kiln are re-opened.
27. The potter checks the condition of the pottery through the wood feeding-holes. Whitish colored pottery indicates a high temperature, while blackish red colors indicate a lower temperature.
28. The amount of additional wood required to fuel the fire can be determined by observing the condition and color of the pottery in the kiln.
29. If additional wood is required for the fire, it can be added through the wood-feeing portholes along the side of the kiln.

30. The front of the kiln is mostly blocked to minimize the intake of colder air.
31. Block most of the front of the kiln to keep out cold air.
32. After observing the color and condition of the pottery inside the flames, the master potter can add more fuel, if needed, through the wood-feeding portholes.
33. The potter observes the condition of the pottery inside by looking through a hole in the top of the kiln.
34. After adding more wood, the potters close the side portholes to prevent any heat from escaping.
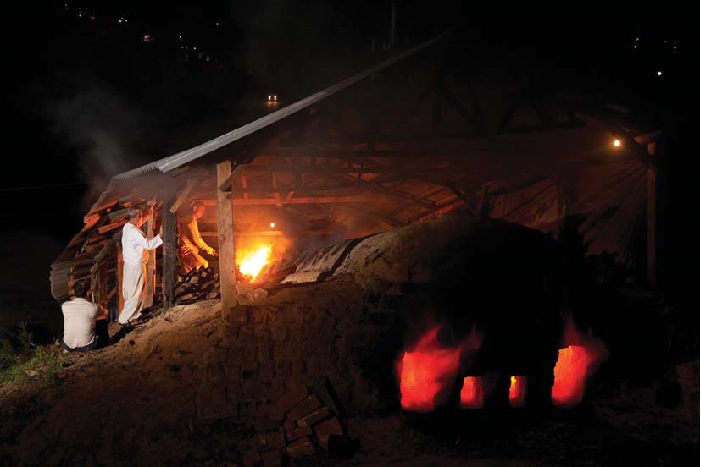
35. The fire is lit both at the front and the back of the kiln to increase the intensity of the flame.
36. The fire is lit evenly across the kiln, ensuring that the pottery cooks evenly.
37. The chimney is blocked after firing to prevent any heat from escaping.
38. The front of the kiln is blocked off after firing.
*This series of article has been made possible through the cooperation of the National Research Institute of Cultural Heritage. (Source: Intangible Cultural Heritage of Korea)
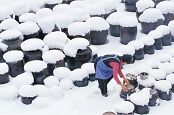
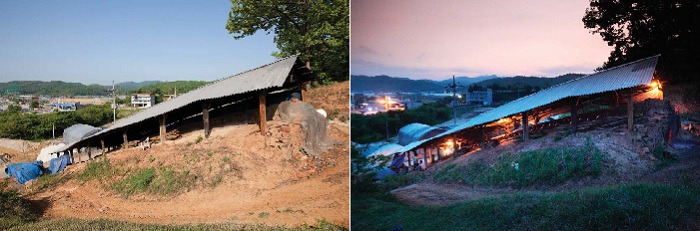
(From left) A panorama of a kiln in daylight; A panorama of a kiln at night.
Firing the Pottery
The method in which the kiln fire is both ignited and put out is very important to the overall process of making successful pottery. It is a result of the master craftsman's untiring effort. Therefore, before the potter starts the kiln fire, he prepares offerings to the spirits so that the endeavor will be successful.
Usually, the kiln is fired for 2-3 days, or for about 45 hours. During the first 15 hours, the fire is slowly heated up so as to dry any moisture that's inside the kiln. Then, the temperature is increased to around 1,200 degrees Celsius, the melting point for the glaze. This intense fire is continued for about 30 hours.
Specific pine logs, changsol in Korean, are used as fuel for the kiln fire. As the kiln is fired, the master potter controls the flames by feeding firewood into the kiln and by checking on the fire through portholes. There are portholes long both sides of the kiln, allowing the potter to check on the color and quality of the pottery inside.
When the firing is finished, the kiln's fire hole, chimney and wood-feeding holes are all completely blocks, to prevent any heat from escaping. This will go on for another 2-5 days, depending on the size of the kiln and the amount of pottery inside. The entire firing process can take up to one whole week.
1. Some pieces of pottery are too dry to bake.
2. The portholes in the top of the kiln are closed before firing.
3. The portholes on the top of the kiln are covered and blocked with clay.
4. After stacking the pottery in the kiln, the side entrances to the kiln are blocked.
5. To clear the kiln of any humidity, a smaller fire is used at first.
6. The process begins with a small, smoking fire, to dry away any moisture inside the kiln.
7. Though any type of wood can be used to fuel the fire, it is important to build the fire gradually. This potter uses oak trees to start the initial fire.
8. Lay a protective layer around the kiln to prevent any cold air from blowing inside.
9. Keep the kiln fire burning evenly for 2-3 days.
10. Gradually increase the heat of the fire.
11. As the firing continues, pine logs are used to build a stronger flame.
12. More logs are stacked along the side of the kiln to prevent any of the pottery from cracking due to cooling flames.
13. At the top of the kiln, soon to be used firewood is preemptively dried using the escaping heat from the kiln.
14. Logs are stacked on the top of the kiln, ready for the final burst of heat.
15. The fire is fed from both the front and the back of the kiln.
16. The pine logs are steadily fed into the fire, to keep the flame constant.
17. The master craftsman observes the kiln from a distance as he prepares more pine logs for the flames.
18. The potter studied the flames of the kiln fire.
19. A pine tree log requires three men to feed into the fire. The flames are burning at up to 1,200 degrees Celsius at this point.
20. The wood feeding holes on either side of the kiln are opened near the end of the firing process.
21. Wood is stacked in the front of the kiln to heat up the flames.
22. When the fire is drawing down, the front of the kiln is partially blocked with bricks.
23. As cold air has begun to enter the kiln, the potters put additional fire onto the flames.
24. The front of the kiln is blocked during the firing process.
25. The front of the kiln is completely bricked over during the final firing process.
26. The wood-feeding holes on either side of the kiln are re-opened.
27. The potter checks the condition of the pottery through the wood feeding-holes. Whitish colored pottery indicates a high temperature, while blackish red colors indicate a lower temperature.
28. The amount of additional wood required to fuel the fire can be determined by observing the condition and color of the pottery in the kiln.
29. If additional wood is required for the fire, it can be added through the wood-feeing portholes along the side of the kiln.
30. The front of the kiln is mostly blocked to minimize the intake of colder air.
31. Block most of the front of the kiln to keep out cold air.
32. After observing the color and condition of the pottery inside the flames, the master potter can add more fuel, if needed, through the wood-feeding portholes.
33. The potter observes the condition of the pottery inside by looking through a hole in the top of the kiln.
34. After adding more wood, the potters close the side portholes to prevent any heat from escaping.
35. The fire is lit both at the front and the back of the kiln to increase the intensity of the flame.
36. The fire is lit evenly across the kiln, ensuring that the pottery cooks evenly.
37. The chimney is blocked after firing to prevent any heat from escaping.
38. The front of the kiln is blocked off after firing.
*This series of article has been made possible through the cooperation of the National Research Institute of Cultural Heritage. (Source: Intangible Cultural Heritage of Korea)