
-
 Korea.net's 24-hour YouTube channel
- NEWS FOCUS
- ABOUT KOREA
- EVENTS
- RESOURCES
- GOVERNMENT
- ABOUT US


View this article in another language
- 한국어
- English
- 日本語
- 中文
- العربية
- Español
- Français
- Deutsch
- Pусский
- Tiếng Việt
- Indonesian
*This is the fifth part in our series, “Gat, traditional headgear in Korea.”
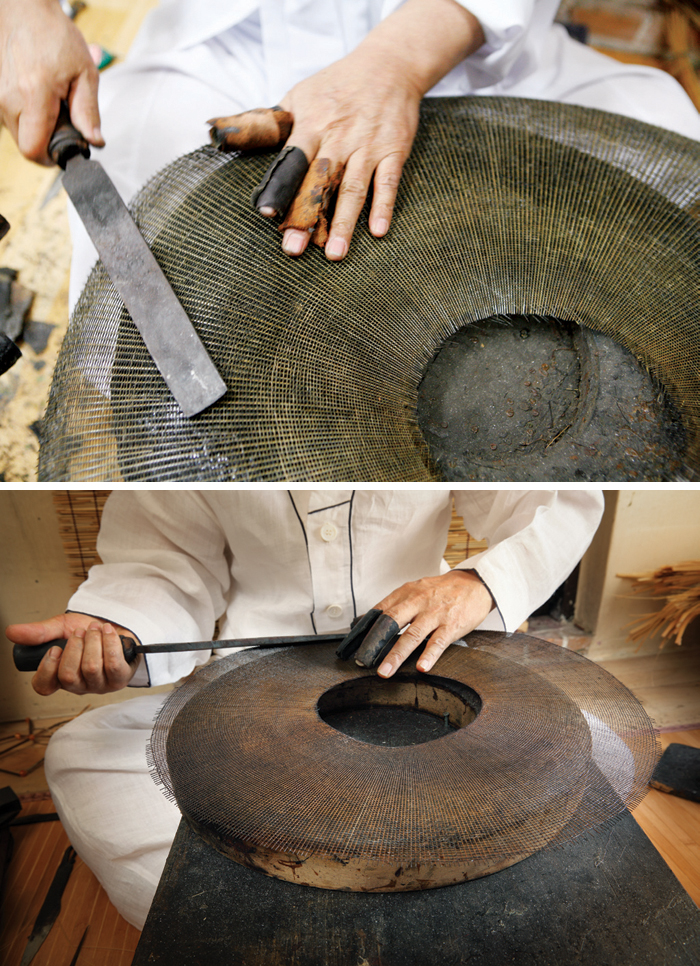
3) Making the yangtae
The manufacturing of a brim refers to the process of enveloping in silk cloth or attaching bamboo or silk strands one by one, according to the needs of beach beoreong and type of hat. This process represents the gat’s aesthetic characteristics and uniqueness.
The gracious curve and fabric of the yangtae, or brim, is attributed to the process of bending the flat, bamboo-weave brim with a hot iron to give a gentle curved, circular shape. The beauty of the brim is created by a complicated process of attaching hair-thin bamboo or silk strands, one by one, depending on the style of gat being made. In addition, by covering them with a thin hemp cloth, the combination of the two fabrics lend a refined, transparent sensibility to the brim.
3.3.1 The taujib jabgi, or the curving of the brim
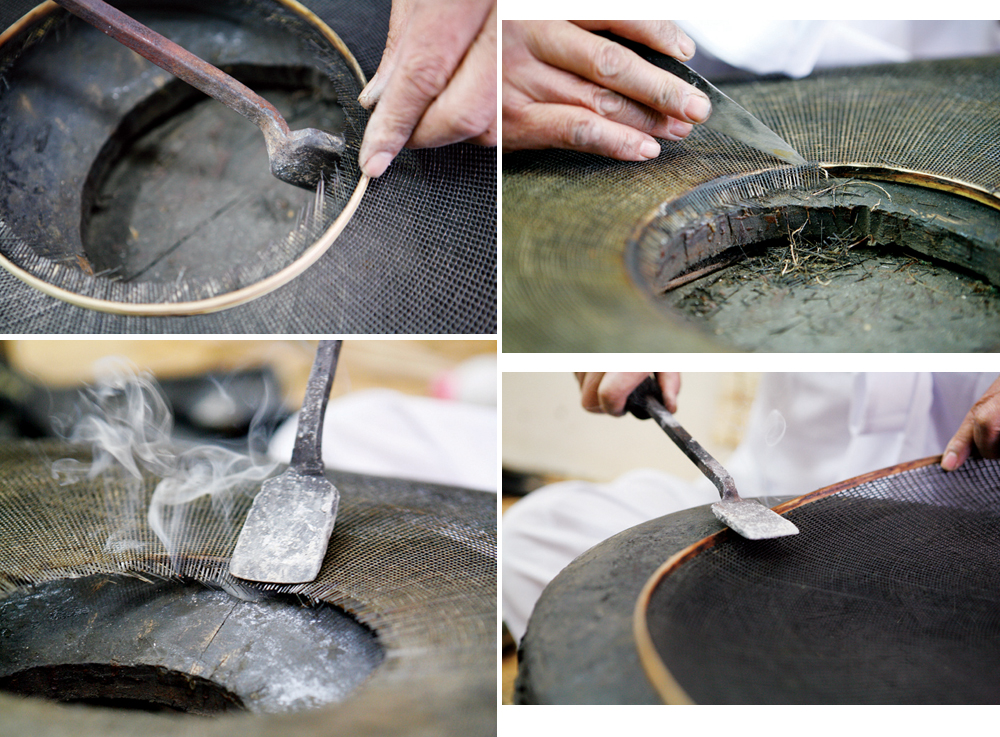
The brim-maker, the yangtae-jang, cuts and trims the parts of the bamboo strips that stick out from the edge of the brim, or yangtae, while heating three irons in the brazier in preparation for the work.
Next, a fish glue mixed with the diluted solution made from the inkstick is applied to the brim. The brim is allowed to briefly dry on the beoreong and put on the brim-making board. Then, the brim-maker adjusts the temperature of the iron and swiftly bends the hat into shape.
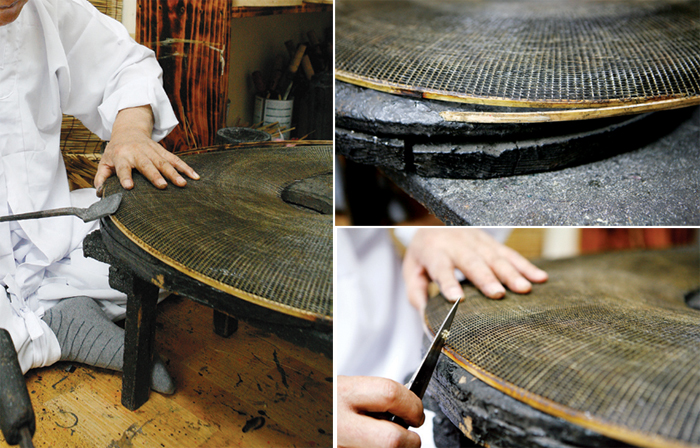
Three types of irons are used in the process of bending the brim. The process of curving the brim is called the teujib jabgi. One iron with a small round base is used to sear and bend the end of the brim. Another, with a flat, long side, is used to make a gentle curve form the inner rim to the center and to the edge of the brim on the exterior surface. A medium-sized iron with a rounded front is used to press and bend the end of the brim.
After finishing this work, the prepared cheoldae and jimitdae frames need to be attached to the brim. For this, first, the size of the brim is adjusted with regard to those outer and inner frames, and the point at which these frames are joined is marked using an iron. Then, the unnecessary ends and edges of the bamboo are promptly severed. Fish glue is applied and the end result is left to dry in the beoreong. Using a hot iron, the brim is seared and attached to the outer frame. The remaining parts of the brim attached to the outer frame are scraped off with a knife. In order to have them linked smoothly, layers are cut off from both ends of the outer frame that are linked to each other. Then, the fish glue is applied, attached by a searing iron.
For the work of combining the jimitdae with the brim, firstly, the circumference of the crown is measured and a curved inner frame is made accordingly. Then, it is placed beneath the brim and checked with the flat stick whether the intervals are regular. It is marked in four points with a hot iron. As the brim is turned, it is seared and attached to the inner frame with the iron. The remaining interior section of the brim is cut off with the knife.
As the brim is turned, its balance must be checked and modifications must be made by searing and adjusting the outer frame with an iron. The end of the inner frame and corners of the outer frame are severed for smoothness. A sufficient amount of fish glue must be applied onto the brim attached to the inner and outer frames, then left to dry in the beoreong, before the ink is applied.

3.3.6 Nulli hapjang
The nuli hapjang refers to the process of reinforcing the cheoldae and the jimitdae attached to the brim by applying sheets of traditional paper cut to a regular size with a searing iron. Following this process, ink and fish glue must be applied and the brim must be checked to have all openings sealed.
3.3.7 Attaching the bamboo strands and covering it with a silk cloth
Hats vary depending on the main materials used over the crown and the brim. A hat called a porip is made by covering silk or hemp cloth over the crown and the brim. The jinsarip and the juksarip are made by attaching fine strands of silk thread and bamboo, respectively.
The processes of covering silk or hemp cloth over the brim are similar. Water is spread evenly over the cloth, which is then placed over the brim. This is attached to the outer frame and then a portion of jimit is singed and cut. The cloth is trimmed with a knife and then, using a heated iron, it is singed clean from the outer and inner frames.
The deungsa is the work attaching each strand of bamboo or silk thread over the brim. Generally, the strands are attached outward, with wider spaces in the upper part than in the lower part. Using a heated iron, the strands are seared and attached only to the cheoldae and to the jimit. After this work is completed, the remainders from both parts are signed and cut with an iron and smoothed out. The work is finished by applying glue and ink.
3.3.8 Attaching the geocheoldae
As a reinforcement, the geocheoldae, a sort of extra brim, is added to the cheoldae, the brim already attached and covered by silk cloth or attached by fine bamboo strands. With the brim stuck between the makers’ legs, and using a heated iron, the outer strip of bamboo is attached to the cheoldae by gently pressing the strip’s middle part and then the upper and lower parts, against the cheoldae. After sticking the outer strip around the cheoldae, the brim is placed on the board and checked while the frame is seared with an iron. This geocheoldae is trimmed with a knife, smoothed out and then coated with glue and paint. While doing this work, glue is applied underneath the inner frame, to which the hat is attached.
3.4) Assembling the gat
The final step in making the hat is the assembling of the gat, the mot bakgi.
Saliva is applied to the interior of the jimit and the lower portion of the crown is gently pressed onto the brim. Putting a hand inside the crown, the craftsman adjusts its height using the binetdae. If it is balanced, four corners are marked with a heated iron, then pressed and seared. The portion sticking out from the jimitdae is cut away and glue is applied to the interior of the jimitdae to allow the eungak to be set in place.
The prepared eungak is cut to fit the circumference of the jimitdae. The dwisae, made with traditional Korean paper, is placed where both ends adjoin. Subsequently, glue is applied and the hat is left to dry.
The ttamdae is coated with ink and glue, then placed on the beoreong. Saliva is applied to the portion on which the ttamdae is to be hung, below the decorative accessory of the eungak, and then it is trimmed and smoothed. Holes are pierced for the gat string with a heated garakggoji, or awl.
3.5) Applying ink and lacquer, and attaching the jukyreong
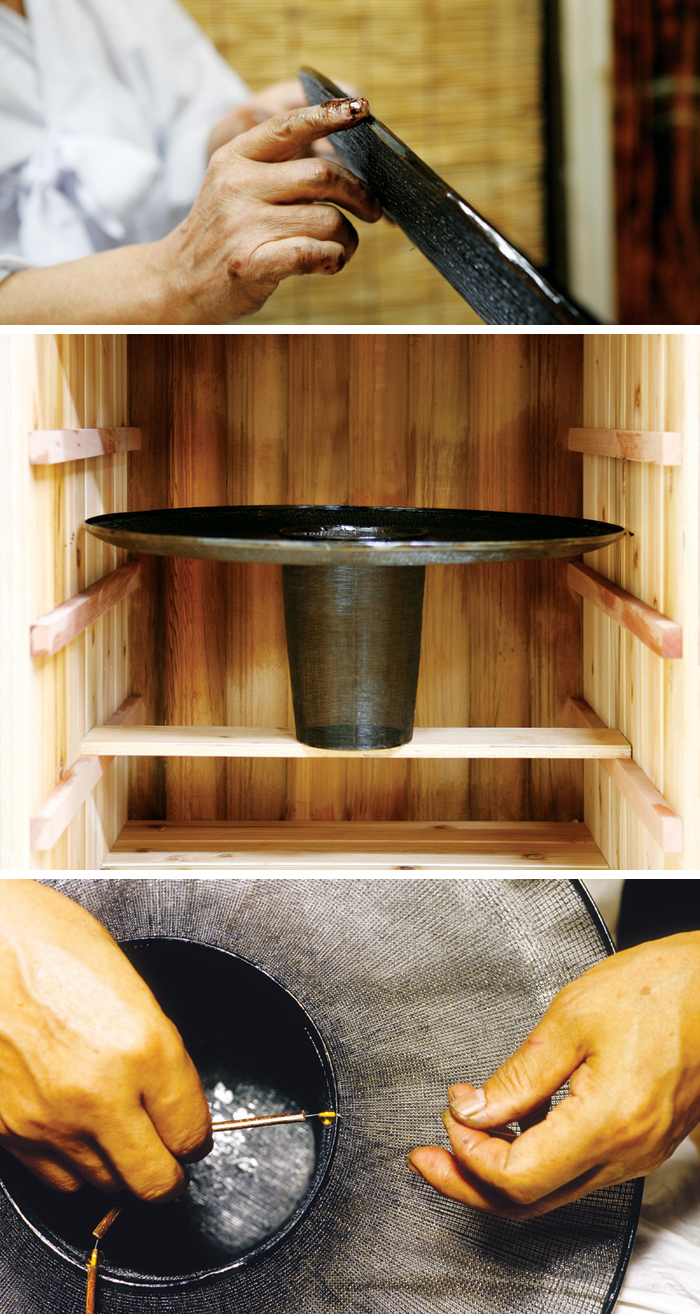
First of all, an ink stick is ground against an ink stone to make a dense ink. The hat is turned and the black ink is applied to every part of the hat, from the interior outward, including behind the ttamdae and the jimit. It is then left to dry.
After the coat of ink dries, the lacquering process begins, again starting with the interior of the hat. In the final step, the craftsman slowly rotates the hat while using his finger tip to coat the cheoldae, the ttamdae, the motte and the jimitdae with lacquer. The lacquer coating must then dry for 24 hours in the chiljang. Several repetitions of this process allows for a graceful black coating on the gat.
*This series of article has been made possible through the cooperation of the National Research Institute of Cultural Heritage. (Source: Intangible Cultural Heritage of Korea)
3) Making the yangtae
The manufacturing of a brim refers to the process of enveloping in silk cloth or attaching bamboo or silk strands one by one, according to the needs of beach beoreong and type of hat. This process represents the gat’s aesthetic characteristics and uniqueness.
The gracious curve and fabric of the yangtae, or brim, is attributed to the process of bending the flat, bamboo-weave brim with a hot iron to give a gentle curved, circular shape. The beauty of the brim is created by a complicated process of attaching hair-thin bamboo or silk strands, one by one, depending on the style of gat being made. In addition, by covering them with a thin hemp cloth, the combination of the two fabrics lend a refined, transparent sensibility to the brim.
3.3.1 The taujib jabgi, or the curving of the brim
The brim-maker, the yangtae-jang, cuts and trims the parts of the bamboo strips that stick out from the edge of the brim, or yangtae, while heating three irons in the brazier in preparation for the work.
Next, a fish glue mixed with the diluted solution made from the inkstick is applied to the brim. The brim is allowed to briefly dry on the beoreong and put on the brim-making board. Then, the brim-maker adjusts the temperature of the iron and swiftly bends the hat into shape.
Three types of irons are used in the process of bending the brim. The process of curving the brim is called the teujib jabgi. One iron with a small round base is used to sear and bend the end of the brim. Another, with a flat, long side, is used to make a gentle curve form the inner rim to the center and to the edge of the brim on the exterior surface. A medium-sized iron with a rounded front is used to press and bend the end of the brim.
After finishing this work, the prepared cheoldae and jimitdae frames need to be attached to the brim. For this, first, the size of the brim is adjusted with regard to those outer and inner frames, and the point at which these frames are joined is marked using an iron. Then, the unnecessary ends and edges of the bamboo are promptly severed. Fish glue is applied and the end result is left to dry in the beoreong. Using a hot iron, the brim is seared and attached to the outer frame. The remaining parts of the brim attached to the outer frame are scraped off with a knife. In order to have them linked smoothly, layers are cut off from both ends of the outer frame that are linked to each other. Then, the fish glue is applied, attached by a searing iron.
For the work of combining the jimitdae with the brim, firstly, the circumference of the crown is measured and a curved inner frame is made accordingly. Then, it is placed beneath the brim and checked with the flat stick whether the intervals are regular. It is marked in four points with a hot iron. As the brim is turned, it is seared and attached to the inner frame with the iron. The remaining interior section of the brim is cut off with the knife.
As the brim is turned, its balance must be checked and modifications must be made by searing and adjusting the outer frame with an iron. The end of the inner frame and corners of the outer frame are severed for smoothness. A sufficient amount of fish glue must be applied onto the brim attached to the inner and outer frames, then left to dry in the beoreong, before the ink is applied.
(Left) Applying the mixture of fish glue and ink; (Right) Curving the flat bamboo-weave brim.
(Top) Curving the flat bamboo-weave brim; (Right) Curving the flat bamboo-weave brim.
(Left) Attaching the cheoldae to the brim; (Right, top) Trimming the remaining of the brim attached to the cheoldae; (Right, bottom) The linkage of both ends of the cheoldae.
(Left) Attaching the jimitdae to the brim. (Right, top) Trimming the remaining of the brim attached to the jimitdae. (Right, bottom) Balancing the curves of the brim.
3.3.6 Nulli hapjang
The nuli hapjang refers to the process of reinforcing the cheoldae and the jimitdae attached to the brim by applying sheets of traditional paper cut to a regular size with a searing iron. Following this process, ink and fish glue must be applied and the brim must be checked to have all openings sealed.
3.3.7 Attaching the bamboo strands and covering it with a silk cloth
Hats vary depending on the main materials used over the crown and the brim. A hat called a porip is made by covering silk or hemp cloth over the crown and the brim. The jinsarip and the juksarip are made by attaching fine strands of silk thread and bamboo, respectively.
The processes of covering silk or hemp cloth over the brim are similar. Water is spread evenly over the cloth, which is then placed over the brim. This is attached to the outer frame and then a portion of jimit is singed and cut. The cloth is trimmed with a knife and then, using a heated iron, it is singed clean from the outer and inner frames.
The deungsa is the work attaching each strand of bamboo or silk thread over the brim. Generally, the strands are attached outward, with wider spaces in the upper part than in the lower part. Using a heated iron, the strands are seared and attached only to the cheoldae and to the jimit. After this work is completed, the remainders from both parts are signed and cut with an iron and smoothed out. The work is finished by applying glue and ink.
3.3.8 Attaching the geocheoldae
As a reinforcement, the geocheoldae, a sort of extra brim, is added to the cheoldae, the brim already attached and covered by silk cloth or attached by fine bamboo strands. With the brim stuck between the makers’ legs, and using a heated iron, the outer strip of bamboo is attached to the cheoldae by gently pressing the strip’s middle part and then the upper and lower parts, against the cheoldae. After sticking the outer strip around the cheoldae, the brim is placed on the board and checked while the frame is seared with an iron. This geocheoldae is trimmed with a knife, smoothed out and then coated with glue and paint. While doing this work, glue is applied underneath the inner frame, to which the hat is attached.
3.4) Assembling the gat
The final step in making the hat is the assembling of the gat, the mot bakgi.
Saliva is applied to the interior of the jimit and the lower portion of the crown is gently pressed onto the brim. Putting a hand inside the crown, the craftsman adjusts its height using the binetdae. If it is balanced, four corners are marked with a heated iron, then pressed and seared. The portion sticking out from the jimitdae is cut away and glue is applied to the interior of the jimitdae to allow the eungak to be set in place.
The prepared eungak is cut to fit the circumference of the jimitdae. The dwisae, made with traditional Korean paper, is placed where both ends adjoin. Subsequently, glue is applied and the hat is left to dry.
The ttamdae is coated with ink and glue, then placed on the beoreong. Saliva is applied to the portion on which the ttamdae is to be hung, below the decorative accessory of the eungak, and then it is trimmed and smoothed. Holes are pierced for the gat string with a heated garakggoji, or awl.
3.5) Applying ink and lacquer, and attaching the jukyreong
First of all, an ink stick is ground against an ink stone to make a dense ink. The hat is turned and the black ink is applied to every part of the hat, from the interior outward, including behind the ttamdae and the jimit. It is then left to dry.
After the coat of ink dries, the lacquering process begins, again starting with the interior of the hat. In the final step, the craftsman slowly rotates the hat while using his finger tip to coat the cheoldae, the ttamdae, the motte and the jimitdae with lacquer. The lacquer coating must then dry for 24 hours in the chiljang. Several repetitions of this process allows for a graceful black coating on the gat.
(Left) Finishing the lacquer coating on the cheoldae by hand; (Middle) The gat on its upside down drying shelf in the chilijang; (Bottom) Attaching the jukryeong, or straps.
*This series of article has been made possible through the cooperation of the National Research Institute of Cultural Heritage. (Source: Intangible Cultural Heritage of Korea)
![Gat, traditional headgear in Korea [4]](/upload/content/image/1392690825210.jpg)
![Gat, traditional headgear in Korea [3]](/upload/content/image/1392095636707.jpg)
![Gat, traditional headgear in Korea [2]](/upload/content/image/1391590339998.jpg)

Most popular
- First hearing-impaired K-pop act hopes for 'barrier-free world'
- Event 'K-Beauty Hang Out' draws hundreds in Philippines
- 'Mad Max' director impressed by 'cinema-literate' Korean viewers
- Ceremony in Seoul inducts 2,641 content creators of Korean culture
- Romanian presidential couple visits national cemetery


KOREA.net
Copyright © Ministry of Culture, Sports and Tourism